
Have plenty of room to plug in tools, chargers, lights, and everything else! The outlet rail featured in this How-To is a 4 foot power strip with 12 outlets and a 6 foot long cord that will keep you plugged in. The outlet strip comes with 2 fasteners that snap onto an 8 inch Accessory Hanger (10-AH-008 10-AH-008) placed at each end of the strip. This method allows the outlet strip to be easily moved and eliminates the need for any drilling.
The Power Strip Add-On Assembly Can be Purchased Here
Please Note - Safety First: When handling any electrical appliance or device it is important to ensure proper grounding. These Power Strips below have a third prong cord plug which is intended to fit the round grounding slot on most modern outlet receptacles. The presence of this third prong indicates that the appliance or device has a grounding system, and it is essential that these be plugged into grounded outlets for maximum safety. If you have any questions regarding proper grounding with your home's or business's wiring and outlet system, we strongly recommend consulting with a licensed electrician prior to use.
Overview of the items used for the outlet rail installation:

Attach the Outlet's brackets to the Accessory Hanger (10-AH-00810-AH-008), make sure it is put together the same way as the image below.

Attach the Accessory Hanger (10-AH-00810-AH-008) with Outlet bracket attached to desired location on Wall Control Slotted Pegboard.

Make sure the outlet is completely attached to the brackets.

Done! Enjoy your new Pegboard Power Strip.


You may already have an outlet strip (or a dozen) lying around and want a simple way to attach it to your Wall Control Metal Pegboard Panels. Well you're in luck, this is the guide for you! This Do It Yourself option is a great, inexpensive way to get that power strip with USB ports off the ground and up on your pegboard.
For this project, you will need the following four items. We linked what we used, however, you may have some of these lying around your home or garage:
3-Prong Power Strip Outlet Rail
3M Double Sided Tape (Or Equivalent Industrial Grade Double Sided Tape)
14 Inch Accessory Hanger (10-AH-014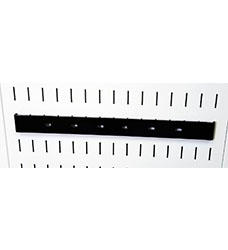 10-AH-014)
Scissors
Step 1) Collect Supplies listed above; a USB Power Strip, Surge Protector, or regular Outlet Strip, Double Sided Tape, a 14in Accessory Hanger (10-AH-01410-AH-014) and Scissors.

Step 2) Stick the tape onto the back of the power outlet strip.

Step 3) Cut tape when you have reached the desired length and press the tape firmly onto the power strip.

Step 4) Peel off the backing layer of the tape to reveal the other adhesive side.

Step 5) Press the accessory hanger onto the tape. Make sure you have the power strip facing the desired direction as it is hard to remove once stuck. The photo below shows the hanger in the correct upright position.

Step 6) Attach your new Wall Control Power Strip Outlet Rail to your desired location to fulfill all of your charging needs on your Wall Control Slotted Metal Pegboard Panels!
